![[Cover] How to Cut Sheet Metal](https://www.techlifeland.com/wp-content/uploads/2019/09/Cover-How-to-Cut-Sheet-Metal-1024x683.jpg)
Sheet metals are fabricate in a wide variety of lengths and thickness. Each type is to be cut with a certain tool. Before choosing a tool and starting to work, you need to figure out the measurement of the sheet metal. To do so, you may use a sheet metal gauge that would measure in terms of gauge numbers and inches. In this guide, we show you how to cut sheet metal using the most common power tools.
How to Cut Sheet Metal Using an Electric Chainsaw
Electric chainsaws are best used when cutting straight and large lines.
- Apply some wax on your saw’s blade to lessen its sharpness.
- Use a painter’s tape to wrap both sides of the metal sheet on the cutting line. This will help you achieve clean and neat cuts as well as protect the sheet against scratches.
- Then, the chainsaw’s chain should be placed against the metal’s edge.
- Hold the saw and push the blade forward and slowly. If you’re not well-experienced in cutting metal and you’re not acquainted with power tools, starting at a high speed would result in accidents and endanger your well-being.
Recommended Electric Chainsaw:
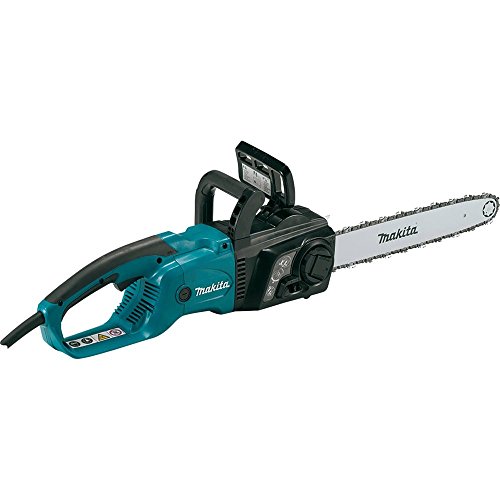
- "Tool-less" blade and chain adjustments for convenient operation and easy maintenance
- Rubberized grip handles are ergonomically designed for comfort
- Large trigger switch with soft start for smooth start-ups

Using Tin Snips
Tin snips are suitable when you’re going to cut thin metal sheets amongst which aluminum, thin stainless steel, tin, and brass. Tin snips’ handles come in different colors, namely red, green, and yellow, with each color signalling the direction towards which you’re going to cut. Red ones are made to cut leftward, green colored ones to cut rightward, and the yellow ones for straight cuts.
- Positioning: First, put the metal sheet in line with the tin snips. Then, fix it in the right place on your workbench. The snips should be aligned exactly with the cutting line. Place the top of the blade in contact with the sheet.
- Cutting: After having set both the sheet and the tin snips in the right position, squeeze the handles to start cutting. Don’t rush in the process, cut slowly, and take a moment between the cuts to ensure equal cuts.
- Directions: Whenever you need to change from right to left, or from left to right, don’t forget to change the tin snips according to your direction.
Recommended Tin Snips:

- 4 Piece offset snip set - Includes left and right offset snips for straight cuts and tight curving left and right cuts....
- Glidetech forged blades - Blades are hot drop-forged of molybdenum alloy steel and austemper heat-treated to provide...
- Pinch-thru-point cuts - Forged blades cut 18 gauge cold-rolled steel from beginning of blade all the way to the tip with...

Using Dremels
If you’re going to make short and details cuts, the best tool for your task is a dremel because they aren’t large and you can control them easily (unlike angle grinders, for example). They make both curved and straight cuts. However, they’re only practical and effective when making really small cuts. For larger cuts, you’d better use either an electric chainsaw or tin snips; otherwise, you’d waste too much time.
- Clamping: Any material or element to be cut should be first clamped. Attach your metal sheet firmly to whatever available, suitable and solid object.
- Adjusting: Adjust your tool’s speed. Choose a suitable speed that makes it able to carry out the cutting process.
- Positioning: Put the dremel blade against the metal sheet.
- Digging: Put the blade down on the surface, at the edge of the cutting point. Start digging, and carry on until achieving the desired depth. Then, carry on following along the intended cutting line.
- Cutting: Cut through slowly until you complete your cutting line. Try not to change your pace.
Recommended Dremel:
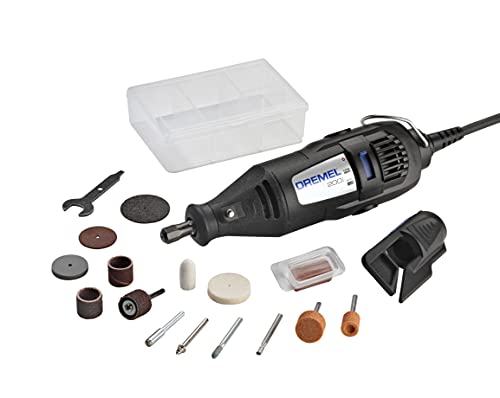
- TWO-SPEED CORDED ROTARY TOOL KIT: An ideal rotary tool that offers the precision and control required to complete a wide...
- HIGH-PERFORMANCE ROTARY TOOL: Its two-speed settings allow you to use the low-speed setting for lighter-duty...
- WHAT'S IN THE KIT: Includes the 675 Lawn Mower and Garden Tool Sharpener, and 15 genuine Dremel accessories ideal for...

Using a Sheet Metal Nibbler
Metal nibblers are suitable for cutting thinner and smaller sheets. Metal nibblers are easier to control in use.
- Clamping and Positioning: Firmly clamp the metal sheet on your workbench. Place the nibbler with its middle in contact with the edge of the cutting line.
- Cutting: Turn on the nibbler and move it slowly along the cutting line until you reach the end of it.
Recommended Sheet Metal Nibbler:

- For clean and precise work in keystone plate, deck plate and other sheet materials
- Slim and ergonomic body design for easy gripping
- Die rotates 360°; large 1/4" stroke

Wrapping Up with Safety Measure
- Make sure to wear entire protection including earplugs, safety goggles, work gloves, and respirators.
- Always fix your cutting material firmly with clumps
References:
- ccohs, Chainsaws – Safe Use of Chain Saws
- bobvila, How To: Cut Sheet Metal
- Makezine, How to Choose, Cut, and Bend Sheet Metal
- Familyhandyman, How to Use Tin Snips to Cut Sheet Metal
![[Cover] Best Gas Pressure Washer](https://www.techlifeland.com/wp-content/uploads/2019/12/Cover-Best-Gas-Pressure-Washer.jpg)
![[Cover] How to Cut Metal](https://www.techlifeland.com/wp-content/uploads/2019/09/Cover-How-to-Cut-Metal.jpg)
![[Cover] Best Cordless Chainsaw](https://www.techlifeland.com/wp-content/uploads/2019/08/Cover-Best-Cordless-Chainsaw.jpg)